How do you turn a photo into a chibi-style illustration? Use PixPix to preserve the subject’s distinctive features.
Turning a real-life photo into a chibi-style image isn’t just about making the head bigger and the body smaller. What truly determines whether the result is recognizable is whether the person can still be identified after significantly altering proportions and artistic style.
This article uses an original character example to demonstrate how to prepare reference photos, break down identity anchors, craft prompts for transforming photos into chibi style, and make localized adjustments to eyes, hairstyles, accessories, and hands. The characters, prompts, and verification methods presented here are for educational purposes only and do not represent actual test results from any specific model.
Quick conclusion: First lock in the character’s identity, then adjust proportions.
Transforming a photo into chibi style can be accomplished in the following sequence:
Choose reference photos with clear facial features, even lighting, and minimal obstructions;
Write down the character’s most important identity anchors, such as face shape, hairstyle, glasses, and clothing color scheme;
Clearly specify the chibi proportions, rather than simply saying “cute cartoon”;
Select only one primary art style, such as flat stickers, soft 3D, or picture-book illustration;
In the first round, check whether the character remains identifiable and whether the head-to-body ratio makes sense;
Choose the best‑structured image, then make localized corrections to eyes, hands, or accessories;
Use the same reference photo and the same set of identity descriptors to expand expressions, actions, and usage scenarios.
A qualified chibi illustration should simultaneously meet two criteria: from afar, it must clearly show the characteristic “big head, small body” silhouette, while up close, viewers should still recognize the character through their hairstyle, facial features, and distinctive accessories.
Chibi is not your average anime avatar
“Chibi style” and “anime style” are not the same thing. Ordinary anime avatars may still retain body proportions close to those of real people, whereas chibi style deliberately exaggerates the head, shortens the torso and limbs, and minimizes realistic details.
Common chibi characteristics include:
The head is noticeably larger than the body, often approaching a two-heads‑to‑body ratio or even more exaggerated proportions;
Eyes are larger and more expressive, yet they still maintain the original character’s eye spacing and gaze direction;
Noses, mouths, and fingers are simplified;
The body has a short, rounded outline, with more compact limbs;
Clothing retains signature colors and structural elements, without striving for realistic fabric details;
Backgrounds are kept simple, ensuring the character’s silhouette remains distinct even at small sizes.
If your prompt simply says “turn this photo into a cartoon,” the result will likely just replace the real person with an illustrated filter. Adding observable proportional descriptions like “chibi style, big head, small body, roughly two heads tall, simplified hands and feet” will provide much clearer guidance.
How to choose reference photos
Reference photos serve to convey identity information, not merely pose. Before you begin, prioritize checking the following conditions.
Clear facial features with no large areas of obstruction
Frontal or slightly side‑turned portraits make it easier to observe face shape, eye spacing, eyebrow shape, and hairline. Sunglasses, masks, strong backlighting, or hair covering half the face all reduce the amount of identifying information that can be preserved.
Even lighting, allowing judgment of skin tone and hair color
Overexposure will erase facial features, while underexposure can blend the hairstyle with the edges of the face. Soft, well-directed lighting is better suited as a starting point for re-creation.
Iconic accessories should appear as completely as possible.
Glasses, earrings, hair clips, scarves, and clothing collars often help maintain a chibi character’s recognizability better than subtle skin textures. If these elements are important to the character, they should be clearly visible in the reference image.
The background shouldn’t overshadow the main subject.
Complex text, densely packed crowds, and high-contrast clutter may all get carried over into the new image. If you can’t replace the photo, explicitly request in your prompt: “Use a clean, monochrome background, and do not retain any text or clutter from the original photo.”
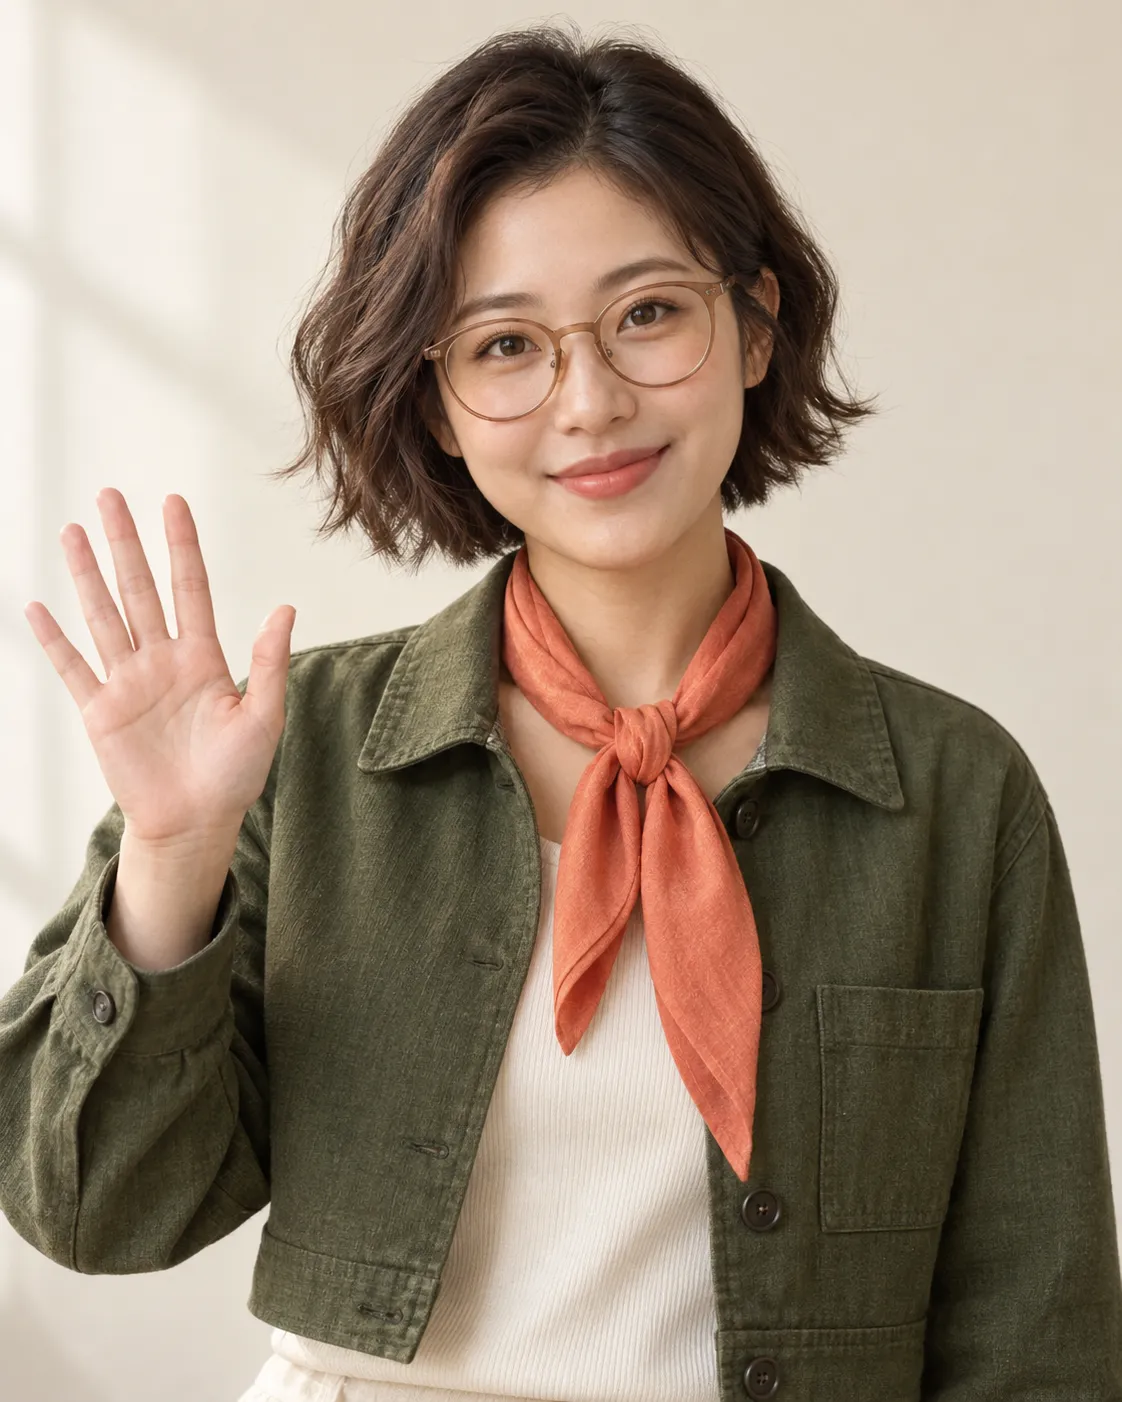
Caption: The original reference portrait uses a frontal gaze, even soft lighting, and a clean background, ensuring that the hairstyle, glasses, eyebrows, eyes, scarf, and waving gesture are all clearly recognizable.
Establish original case studies and identity anchors.
This article introduces an original adult character named “An Ran”: she has short, wavy dark brown hair, a roundish oval face, amber-colored round-frame glasses, and slightly upturned outer corners of her eyebrows. She wears a moss-green cropped jacket and a coral-orange scarf, smiles directly at the camera, and makes a simple waving gesture with her right hand.
These characteristics fall into two categories:
Identity anchors that must be preserved | Elements that can be adapted into chibi style |
|---|---|
Short, wavy dark brown hair and the direction of the hair parting | Head and eye proportions |
Round amber-colored glasses | Degree of simplification for the nose, mouth, and fingers |
Eyebrow shape, interocular distance, and gentle smile | Body and limb proportions |
Moss-green jacket and coral-orange scarf | Clothing surface details |
Frontal gaze and waving gesture | Background, lighting, and overall visual texture |
This breakdown is crucial. If you demand every detail to be “identical,” the model will tend to preserve a realistic appearance; but if you omit all identity anchors entirely, the result might end up being just a generic cute character.
Break the prompt into five modules.
A suitable prompt for transforming a photo into chibi style can be organized according to the following structure:
Character identity + Chibi proportions + Visual style + Actions and background + Elements to preserve and avoid.
Start by listing visible traits of the character’s identity.
Don’t just say “keep it looking like the original person”; instead, enumerate the specific features that truly affect recognition—such as hairstyle, glasses, face shape, eyebrow shape, clothing colors, and expressions.
Proportions need to be specified clearly enough to allow verification.
“Cuteness” cannot be judged directly, whereas “large head, small body, short limbs, approximately two head heights” can be checked item by item in the final result. If the first attempt still resembles a typical anime character, prioritize reinforcing the proportions rather than continuing to add stylistic descriptors.
Choose only one dominant art style at a time.
Flat stickers, soft 3D plush toys, and watercolor picture books each correspond to different lines, textures, and lighting effects. Including “realistic photography, vector stickers, oil painting, and 3D plastic toys” all in one prompt can easily cause conflicting visual languages.
Keep the pose and background simple
For your first conversion, it’s recommended to start with easily recognizable poses such as a frontal standing position, waving, or holding an object. As for the background, use solid colors, gentle gradients, or just a few geometric shapes—this way, the focus stays on the character.
Restrictions address real-world risks
Common risks when converting photos into chibi style include glasses disappearing, hairstyles changing, fingers appearing abnormal, extra accessories showing up, or fake text in the background. Restrictions should target these specific issues rather than piling up vague phrases like “no low quality” or “no ugly.”
Complete your first conversion in PixPix
Enter the PixPix AI Image Workbench, upload a clear reference photo, or attach a photo to a generation task that supports reference materials. Settings may vary depending on the model and entry point; actual available options are subject to the current interface.
Use the complete first-version prompt
Recreate the suggested prompt
Based on the uploaded photo, transform the person into an original chibi-style character. Retain the slightly rounded oval face, dark brown wavy short hair with its original parting, amber-colored round-frame glasses, subtly raised eyebrow tails, and a gentle smile. The character features a distinct head‑to‑body ratio—about two heads tall—with large, round eyes, a short torso, and simplified limbs. Dress them in a moss-green cropped jacket and a coral-orange scarf, standing frontally with a clear waving gesture in their right hand. Create a soft, flat 2D illustration with clean outlines, a low-saturation creamy background, and even lighting. Do not alter the hairstyle, glasses shape, or main clothing color, nor add text, logos, extra figures, additional fingers, or unfamiliar accessories.
This prompt has been rewritten based on the original case presented in this article—it is neither the original prompt shown in the referenced article nor does it imply that every model in PixPix provides a separate negative prompt input box.
In the first round, focus on the outline and identity
After generation, first zoom out to review the overall composition:
Is the head noticeably larger than the body?
Can the character still be recognized by their hairstyle, glasses, and color scheme?
Are both eyes symmetrical, and is the distance between them stable without obvious deviation?
Is the waving motion clear, and are the arms properly separated from the body?
Is the background clean, free of fake text and irrelevant objects?
In the first round, there’s no need to perfect every single strand of hair. As long as the character’s identity and broad outline are established, it’s worth keeping and continuing with localized refinements.
How to choose among three common chibi styles
Style | Visual characteristics | Suitable applications | Key points for prompts |
|---|---|---|---|
2D flat stickers | Uniformly thick outlines, flat color blocks, white sticker borders | Avatar, emoticon stickers, community content | Flat illustration, clear outlines, minimal shadows |
Soft 3D doll | Rounded volumes, soft lighting, matte finish or a subtle resin texture | Gift concept, character showcase, productization proposal | Soft 3D, rounded shapes, gentle studio lighting |
Watercolor picture book | Warm paper texture, soft edges, restrained hand-drawn color variations | Greeting cards, parent–child content, story illustrations | Watercolor, hand-drawn paper texture, warm natural light |
First, choose a primary direction to create the character template. After verifying the identity through this template, switch materials or backgrounds accordingly. This approach makes it easier to maintain consistency than generating three entirely different character sets at once.
2D flat stickers
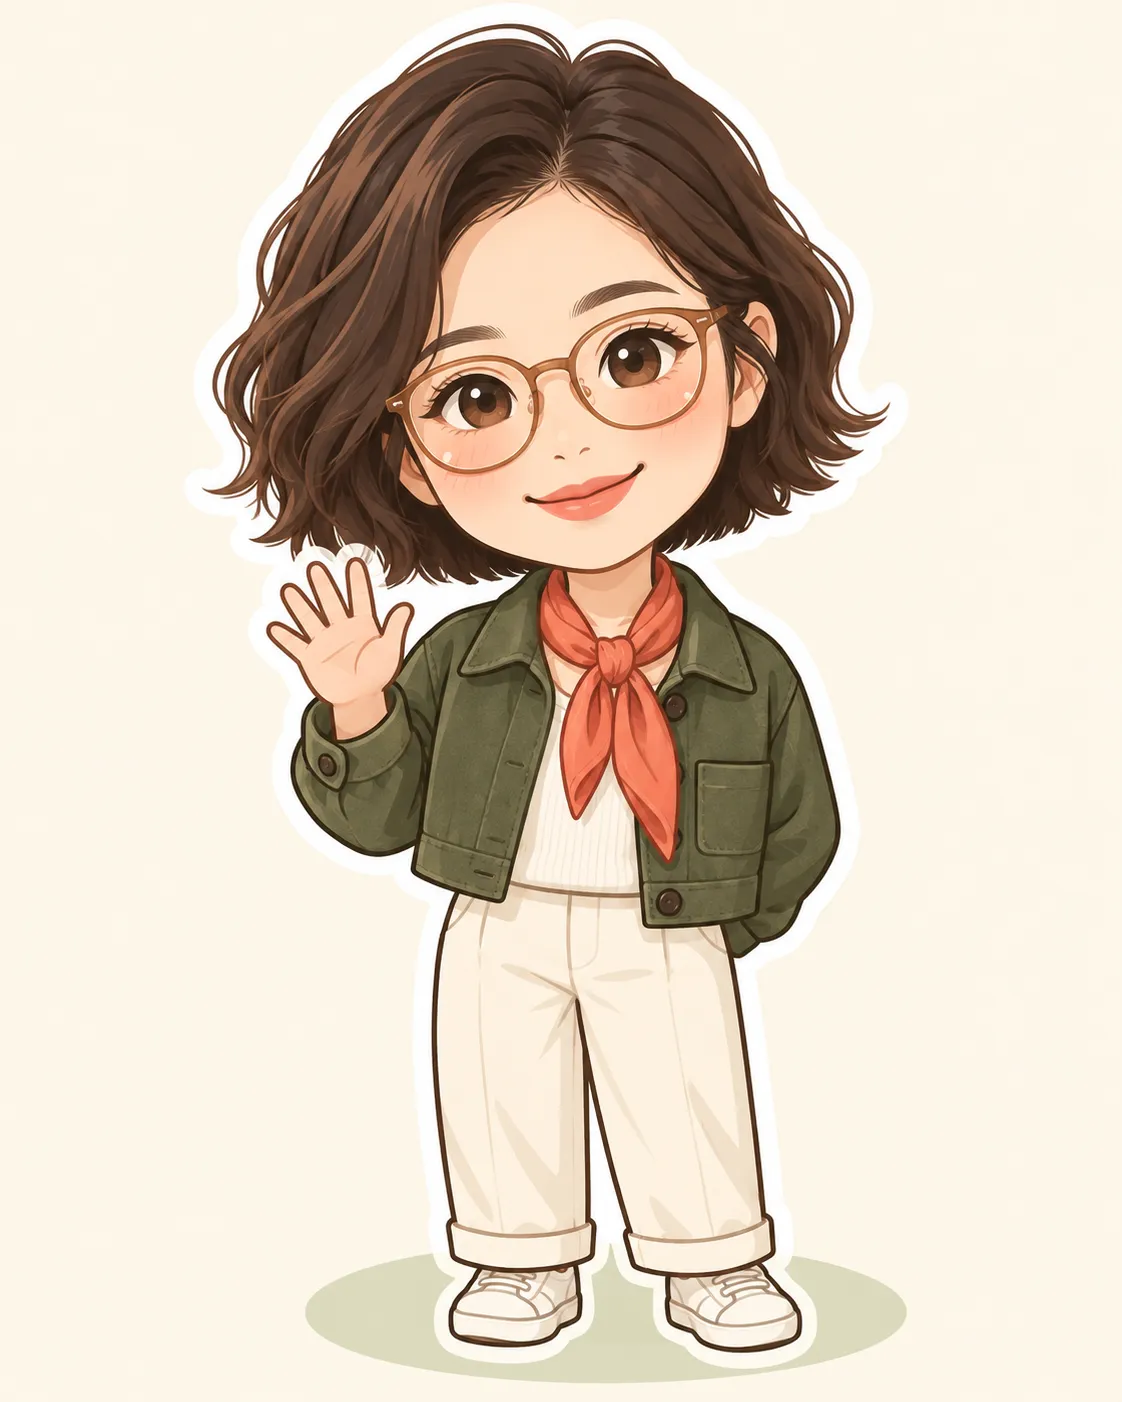
Caption: The 2D version uses clear outlines, solid color blocks, and white sticker borders, making it ideal for profile pictures, social media assets, and emoji stickers.
Soft 3D doll
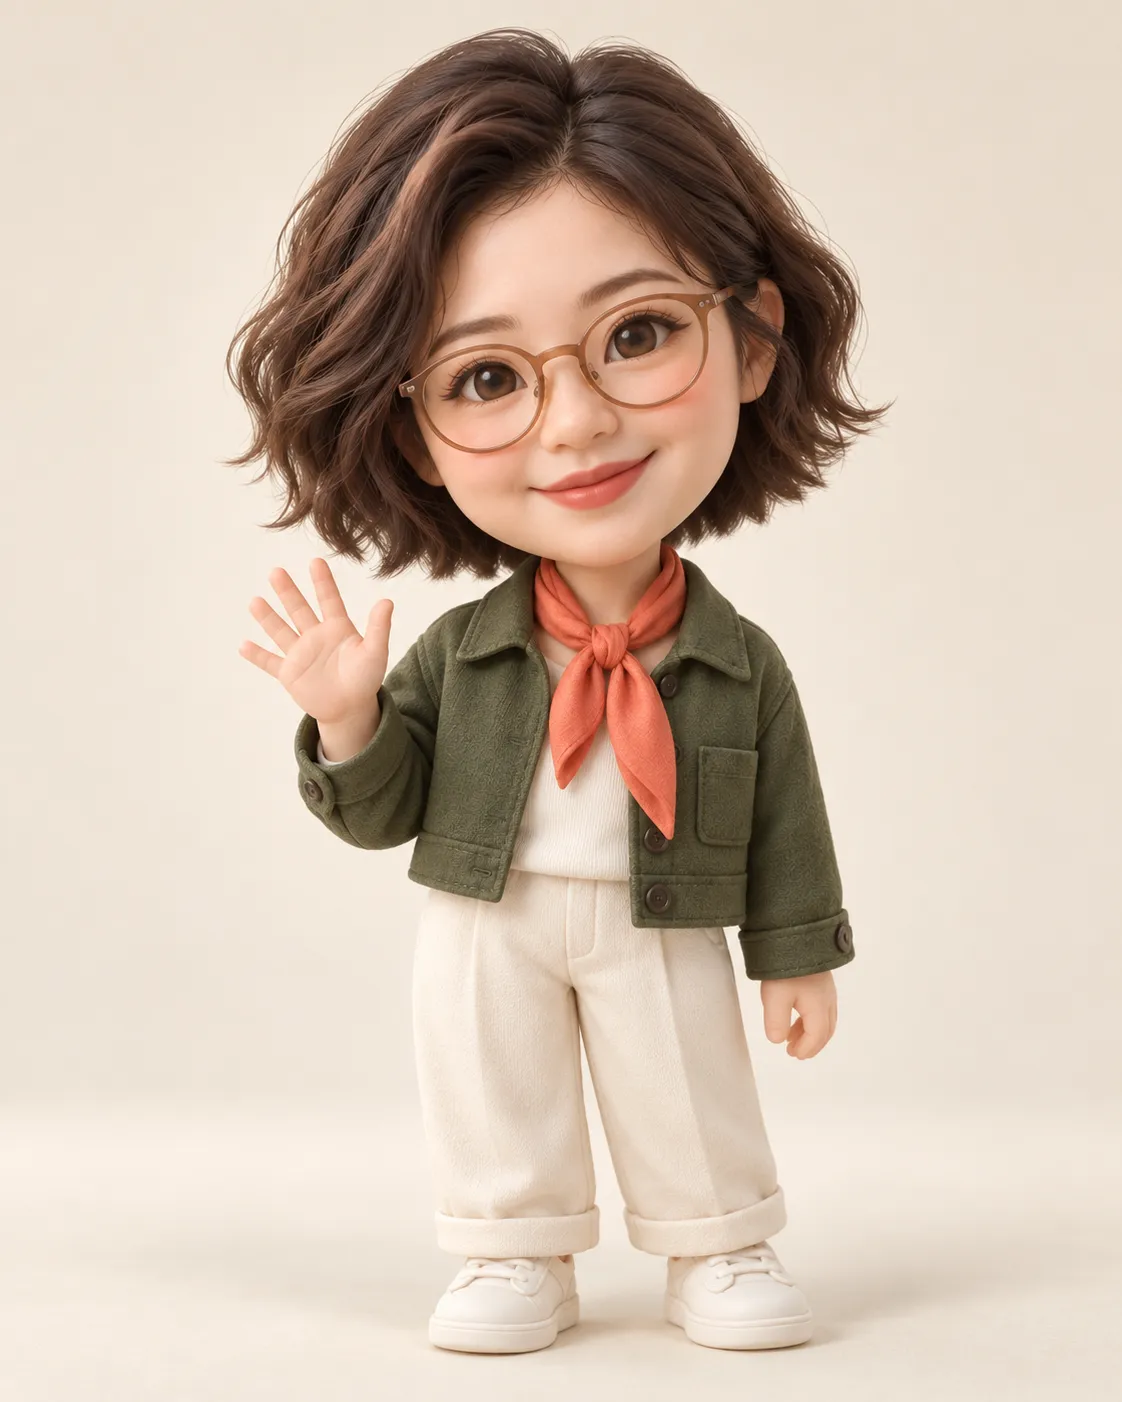
Caption: The 3D version retains the same hairstyle, glasses, jacket, scarf, and waving gesture, enhancing its collectible doll appeal with rounded forms and soft studio lighting.
Watercolor picture book
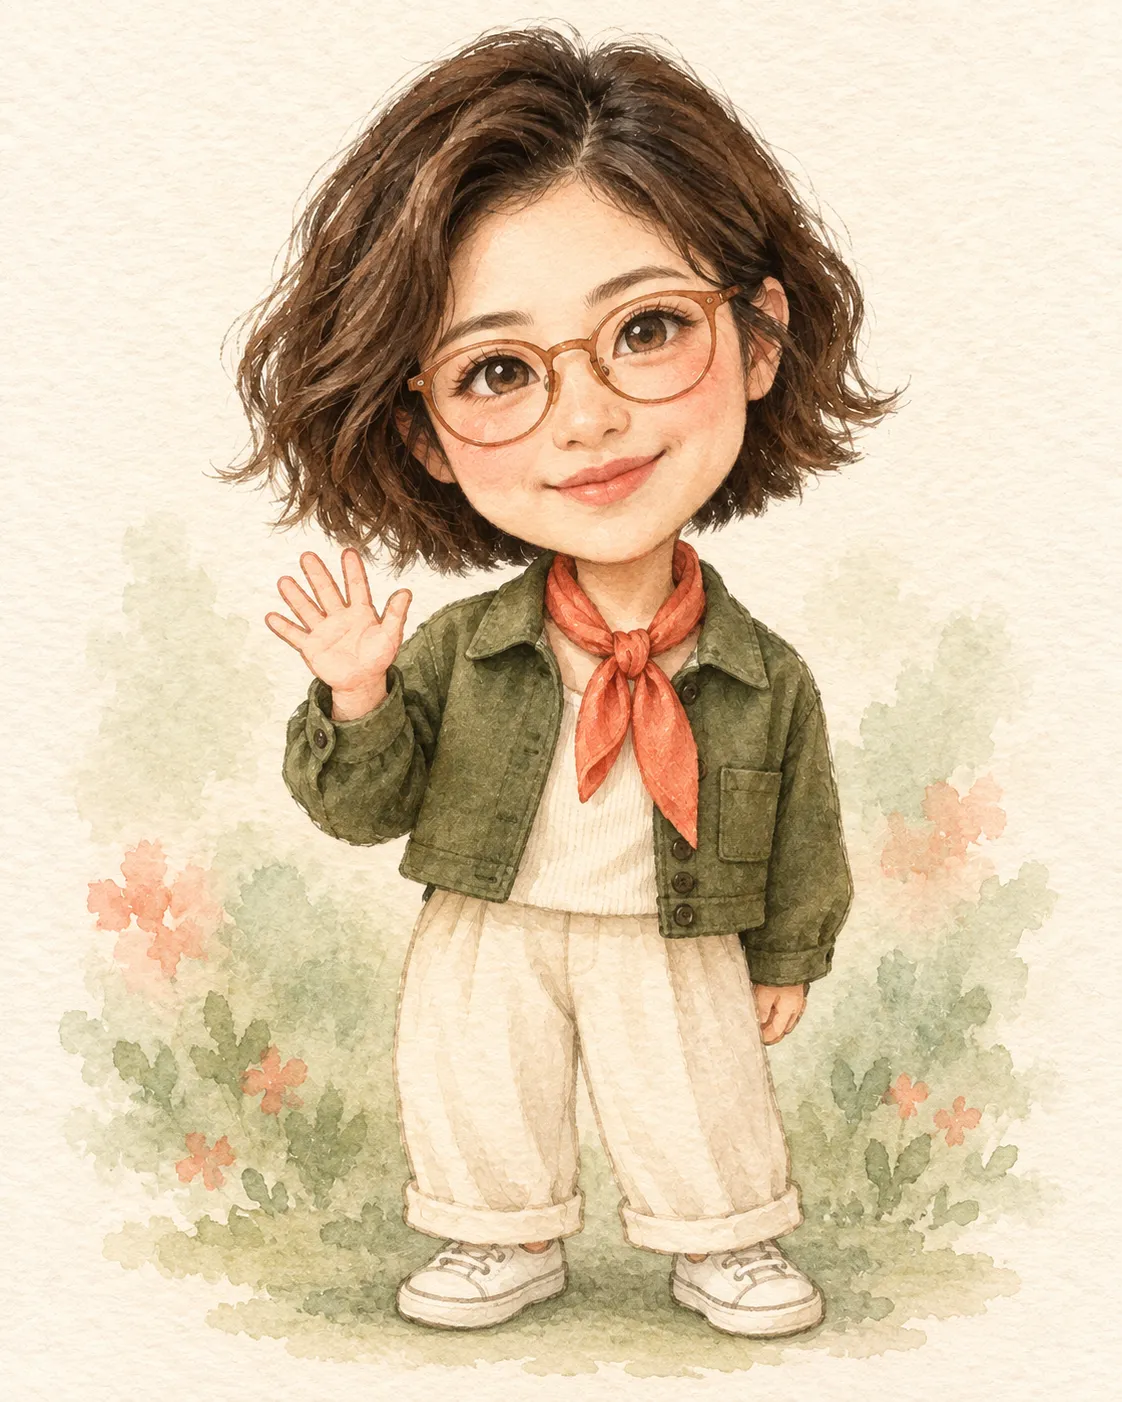
Caption: The watercolor version features paper grain, soft edges, and subtle pigment variations, making it particularly suitable for greeting cards, story illustrations, and warm-themed content.
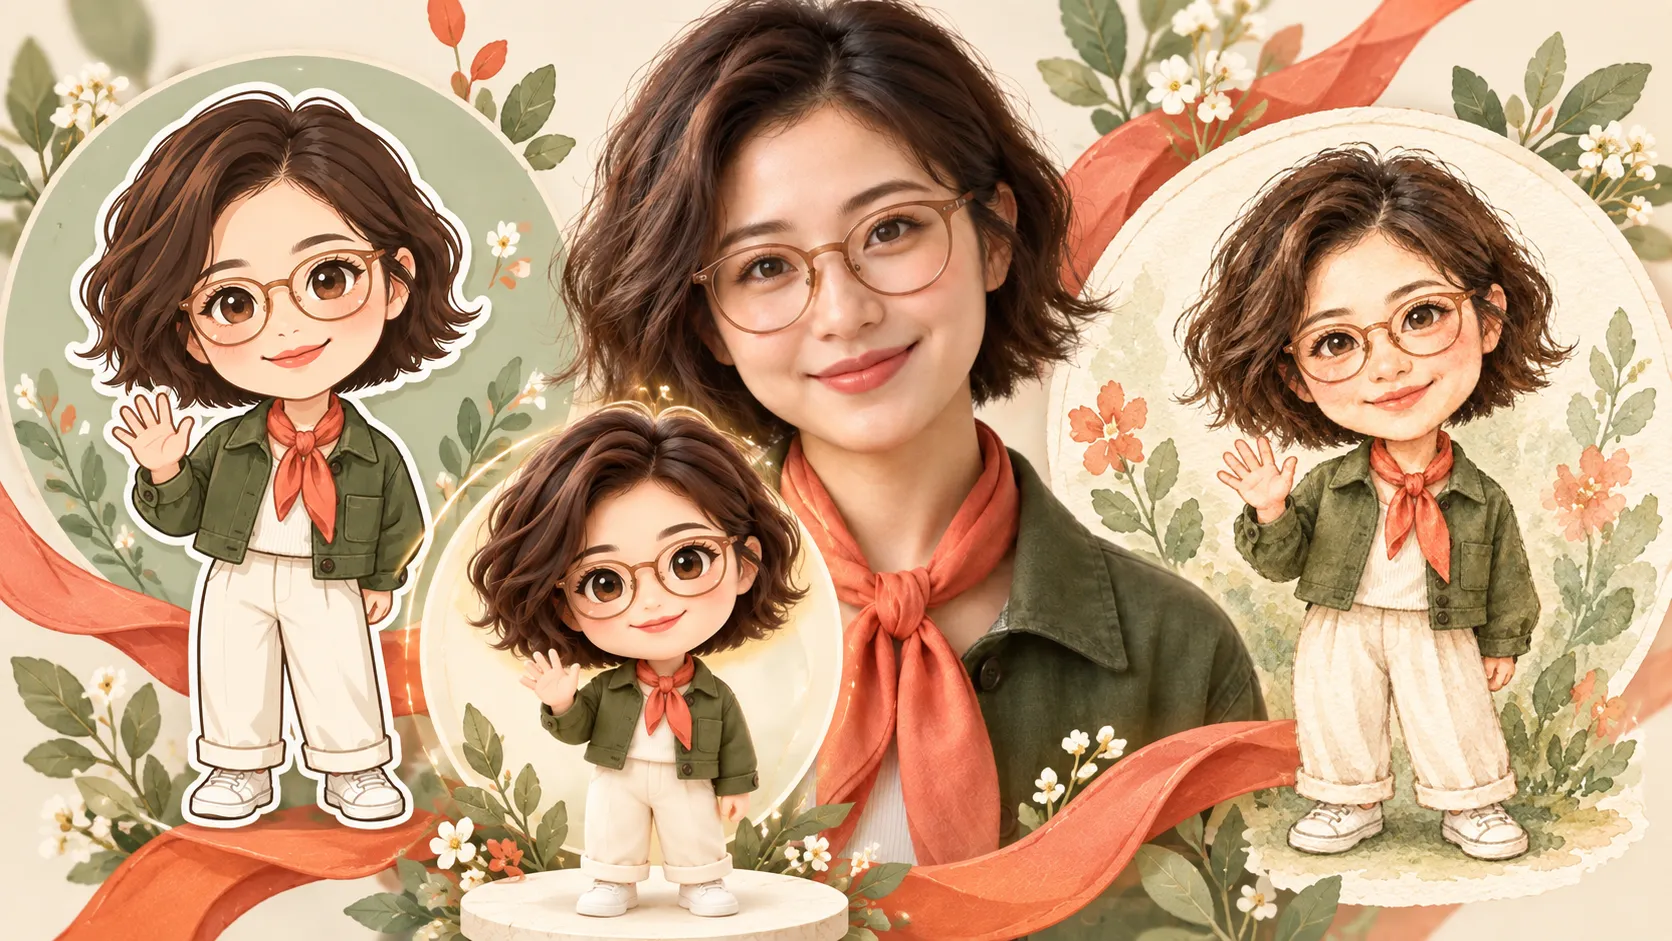
Three styles checked side by side
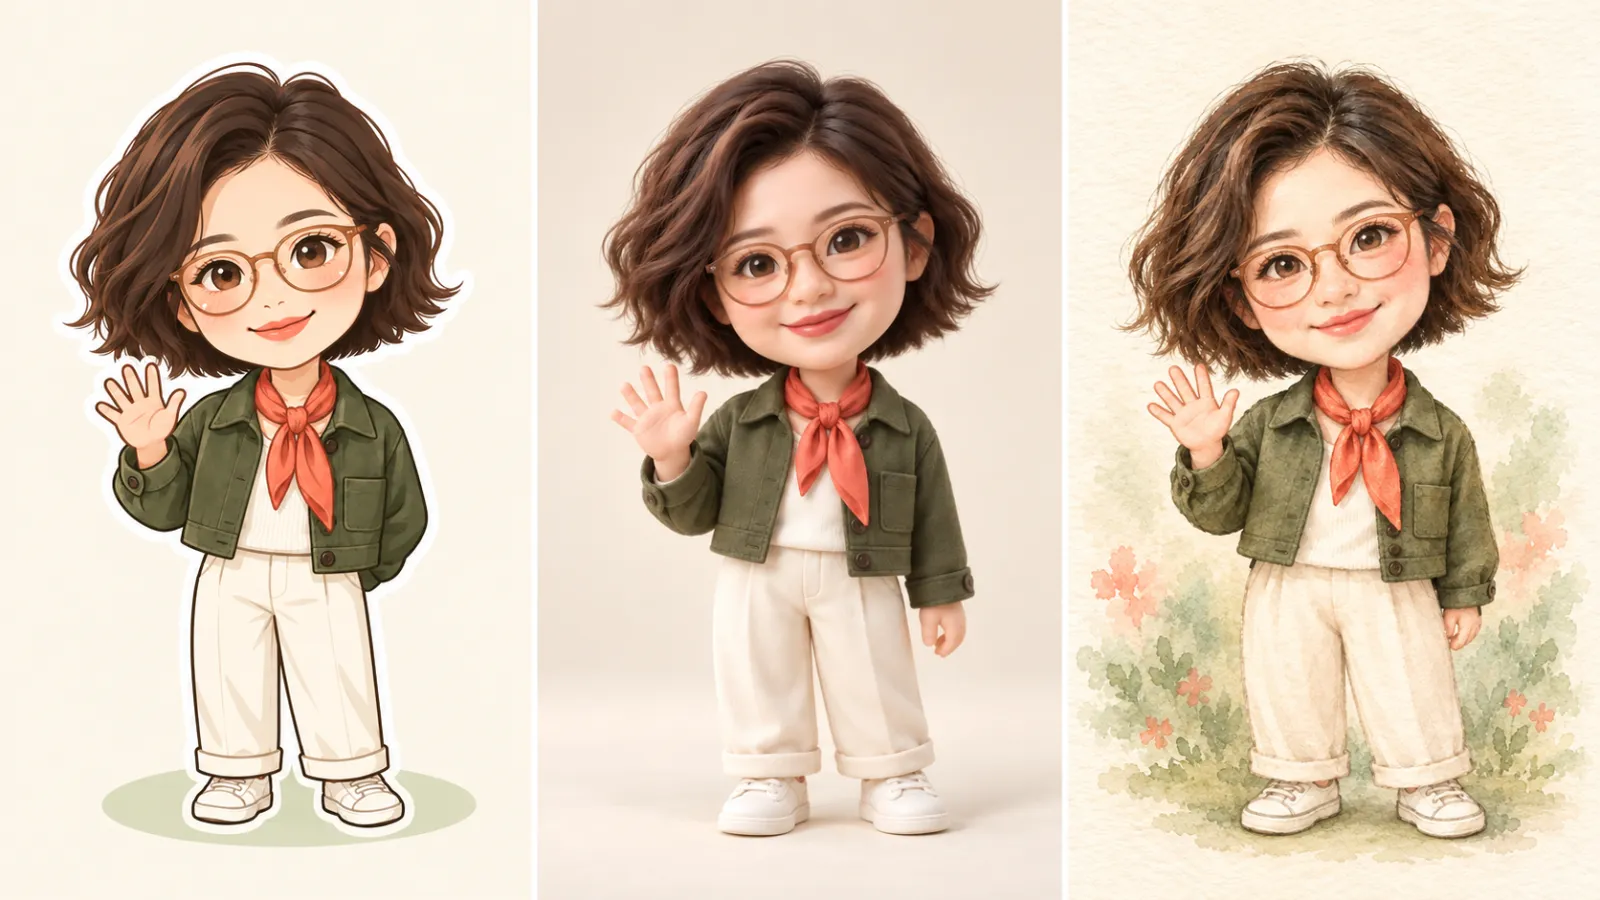
Caption: From left to right are the 2D sticker, soft 3D, and watercolor picture book. The main focus is on medium differences, while also checking whether hairstyles, glasses, scarves, jackets, and gestures remain consistent.
If results aren’t ideal, correct only one major issue
Results resemble ordinary anime characters
Provide detailed proportional descriptions in advance and emphasize them—for example: “Clearly Q‑style, about two head heights tall, with the head occupying nearly half of the total height, short torso, and short limbs.” At the same time, eliminate conflicting terms like “slender,” “fashion model,” or “realistic full-body shot.”
Cute but not resembling the original person
Reduce irrelevant stylistic adjectives, placing hairstyle, glasses, face shape, eyebrow style, and clothing colors at the forefront of your prompt. Avoid judging identity solely based on skin tone or age; prioritize examining facial feature relationships and contour anchor points.
Eyes too large actually diminish recognition
Replace “huge eyes” with “moderately enlarged, rounded eyes that preserve the original photo’s eye distance, gaze direction, and eyebrow–eye relationship.” Q‑style doesn’t mean turning every character into the same type of eyes.
Glasses, hair clips, or scarves disappear
Clearly specify material, color, position, and shape, listing these as “must‑retain.” If the overall composition already works, you can use PixPix’s current local retouching capabilities, selecting only areas near missing accessories for correction.
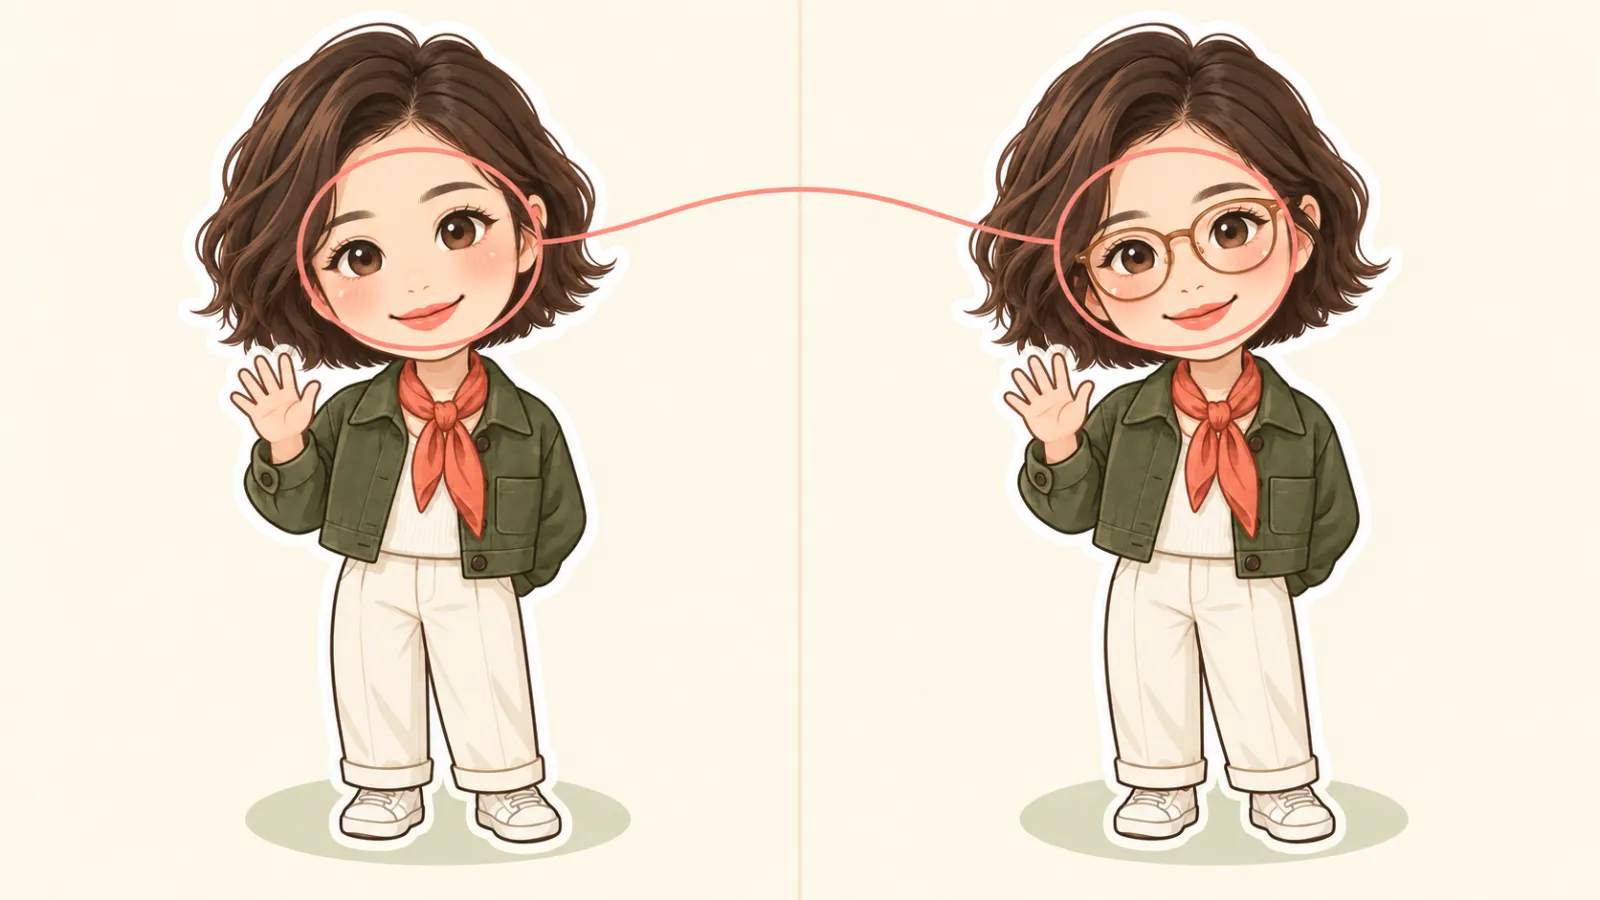
Caption: On the left, we simulate only the absence of glasses; on the right, we restore amber-colored round-frame glasses. Hairstyle, expression, clothing, body proportions, and waving gesture remain unchanged.
Hands appear with extra fingers or fused digits
First, simplify the motion—for example, instead of spreading all five fingers, use a simplified wave gesture resembling wearing gloves, with clearly grouped fingers. If only the hand is off, making localized adjustments is easier than regenerating the entire character to preserve the face and clothing.
How to keep the same person consistent when expanding multiple images
Once the character template has passed inspection, avoid starting from scratch with blank prompts each time. It’s recommended to fix the following:
Always use the same clear reference photo or an already confirmed character template;
Copy the same identity anchor description without rewriting it along with changes in movement;
Fix the hair color, glasses, main clothing color, and art style;
In each round, change only one variable—such as expression, pose, or background;
After generation, first compare the face shape, hairstyle, and accessories, then check the new pose.
For example, when creating emoticon stickers, you can first lock the character’s appearance, then separately generate expressions like happy, puzzled, angry, surprised, and tired. Do not mix changing clothes, hairstyles, viewpoints, or drawing materials all at once within the same round.
Pre-output checklist
Character identity
Is the hairstyle outline and part still preserved?
Are the glasses, eyebrow shape, eye distance, and facial expressions still recognizable?
Are the main colors of the clothing and signature accessories correct?
Q‑style proportions
Is the head large enough, and the body short enough?
Have the hands and feet been simplified without breaking, sticking together, or adding extra limbs?
When previewing at a small size, is the character’s outline still clear?
Purpose of the image
Is the avatar framed in a square or a composition that’s easy to crop?
Do the stickers have clear outer outlines and clean backgrounds?
Are the colors, lines, and lighting across multiple character illustrations consistent?
Does the image lack random text, logos, or obvious features of protected characters?
Frequently asked questions
Can a single photograph directly generate a stable Q‑style character?
It can serve as a starting point, but don’t assume that a single generation will guarantee consistency in every detail. First, create a character template using a clear photo, then expand the series by using the same reference image, fixed identity descriptions, and single-variable modifications—it’s much easier to control deviations this way.
Are Chinese prompts acceptable?
Yes, they are fine. Prioritize using language you can describe accurately, clearly stating identity, proportions, style, and any constraints. If a particular model repeatedly misinterprets a certain term, replace it with a more specific, visible description.
Do I need to write separate negative prompts?
It depends on whether the current model and interface provide independent fields. If there isn’t a separate field, simply add “do not include…” at the end of the main prompt, keeping the restrictions brief and specific.
Can you directly generate chibi versions of well-known anime characters?
If the content is planned for public release or commercial use, avoid copying the names, costumes, logos, or highly distinctive combinations of features of protected characters. A safer approach is to start from original characters and original color schemes.
When should partial retouching be used?
Use it when the character’s identity, composition, and overall proportions are already established, but issues remain only with details like glasses, strands of hair, hands, or small accessories. If the face shape or head-to-body ratio is incorrect, regenerating the character from scratch is usually more straightforward than repeatedly making minor adjustments.
Summary
Turning a photo into a chibi version isn’t simply applying a cartoon filter to a real person; rather, it’s a structured stylistic reconstruction:
Prepare the photo clearly → Define identity anchors → Specify chibi proportions → Choose a single art style → Select a base character template → Make localized corrections → Expand the series using fixed references.
When starting a task in PixPix, first let the model know which features must be preserved, then specify which parts can be exaggerated. This way, the generated characters will not only look adorable but will also be easier to adapt for avatars, stickers, greeting cards, and social media content.
AI Image Tool Built for E-commerce Teams
For new product launches, advertising, and promotional campaigns, use AI to generate product images, scene visuals, ad creatives, and short video assets — making content production faster.